How to add transitions in Premiere Pro
Place a dissolve at the cut, adjust its length and alignment, and check the unused frames that keep both shots moving. Includes audio crossfades and default transitions.

To add a transition in Premiere Pro, open Window > Effects, expand Video Transitions and drag Cross Dissolve onto the cut between two clips. Select the transition to change its Duration and Alignment in Effect Controls. I start with a short dissolve because it lets the change of shot carry the scene without adding another movement.
If the picture freezes during the dissolve, check the unused frames beyond the cut. A transition needs those frames to keep both shots moving; stretching its duration cannot create missing footage.
Put the transition on the edit point
Use two adjacent clips on the same video track. Read the example stack from top to bottom: V1 clip A followed immediately by clip B; A1 their linked audio, meeting at its own cut directly below. Picture and sound can have different transitions and lengths.
- Open the Effects panel. Choose Window > Effects, then expand Video Transitions. Search for Cross Dissolve if you would rather find it by name than browse the folders.
- Find the junction. Zoom into the Timeline until the line between the two video clips is clear. A gap is empty sequence time; close an unintended gap before placing a transition between the shots.
- Drag Cross Dissolve onto that line. Release it across the cut, rather than at a separate opening or closing edge. Adobe's transition procedure uses this Effects-to-edit-point route.
- Play across it. Put the playhead a little before the transition and play through. Watch both shots: each should keep moving as one fades into the other.
To fade the beginning or end of an isolated clip, drag a transition to that outer edge. It becomes single-sided automatically. On an upper video track, use Cross Dissolve for a simple fade of that clip: Dip to Black can also affect video on lower tracks.
Change the length and placement
Effects is where you choose the transition. Effect Controls is where you adjust the one already on the timeline. Select the transition block itself, then open Window > Effect Controls.
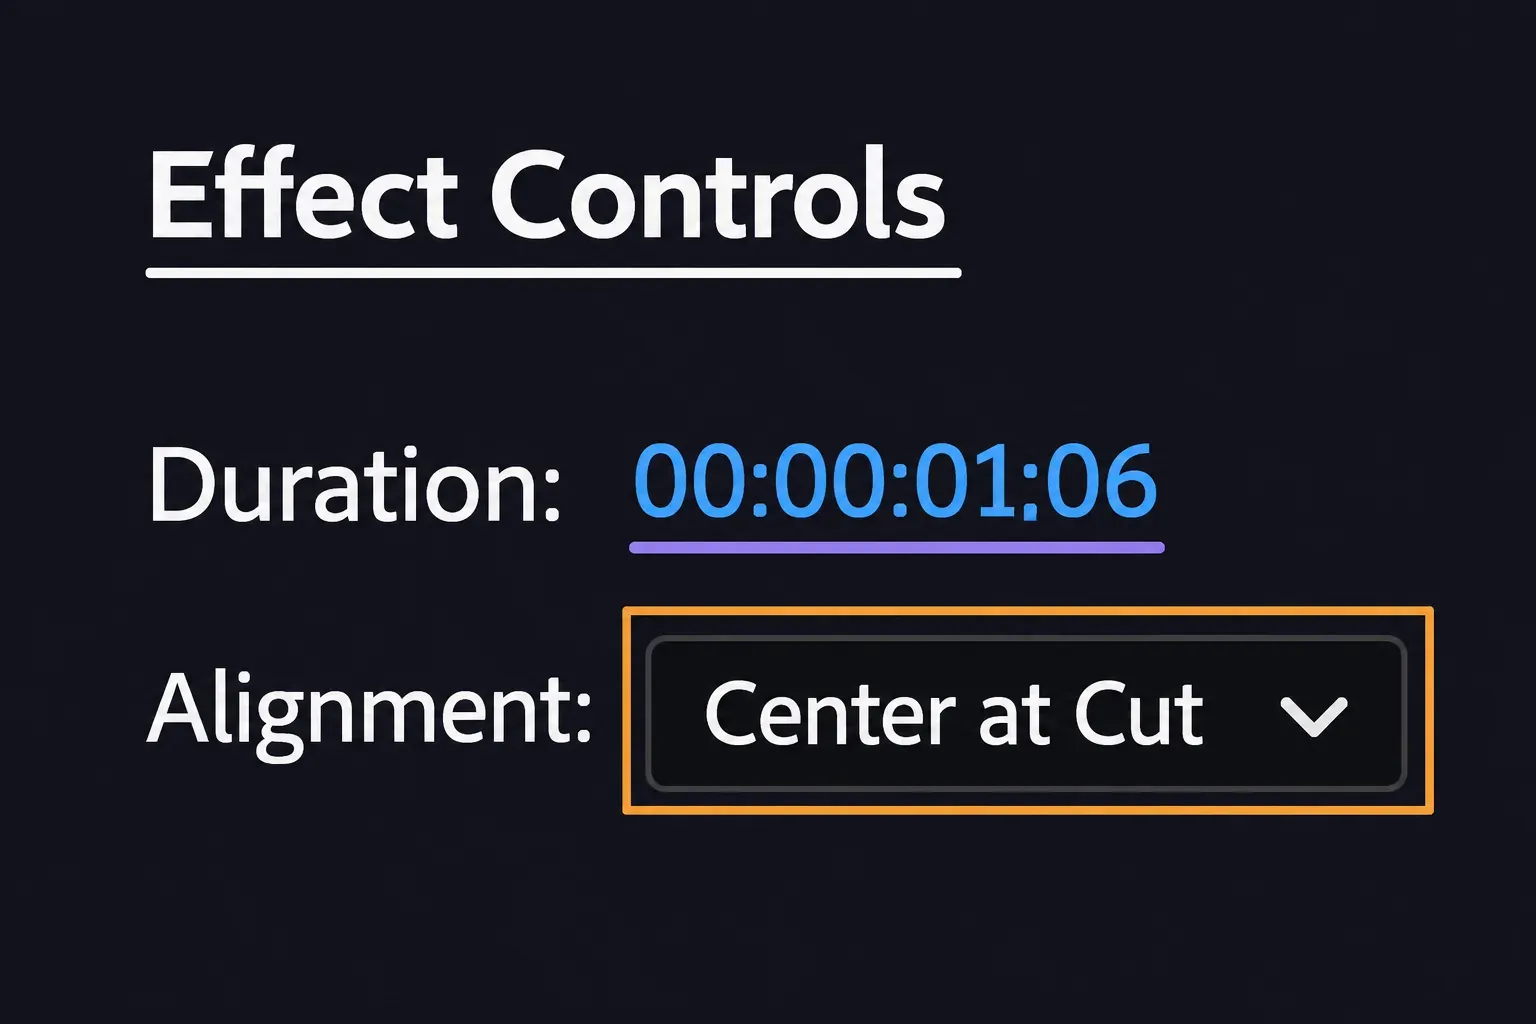
Change Duration in Effect Controls, or drag either end of the transition in the Timeline. You can also double-click a video transition to open Set Transition Duration, enter the new value and select OK. A longer transition needs more unused source frames, as Adobe's duration instructions explain.
Use the Alignment menu to choose its position:
- Center at Cut: the transition straddles the edit point. Changing Duration extends or contracts both ends equally.
- Start at Cut: it begins at the edit point, over the incoming clip; changing Duration moves its end.
- End at Cut: it finishes at the edit point, over the outgoing clip; changing Duration moves its beginning.
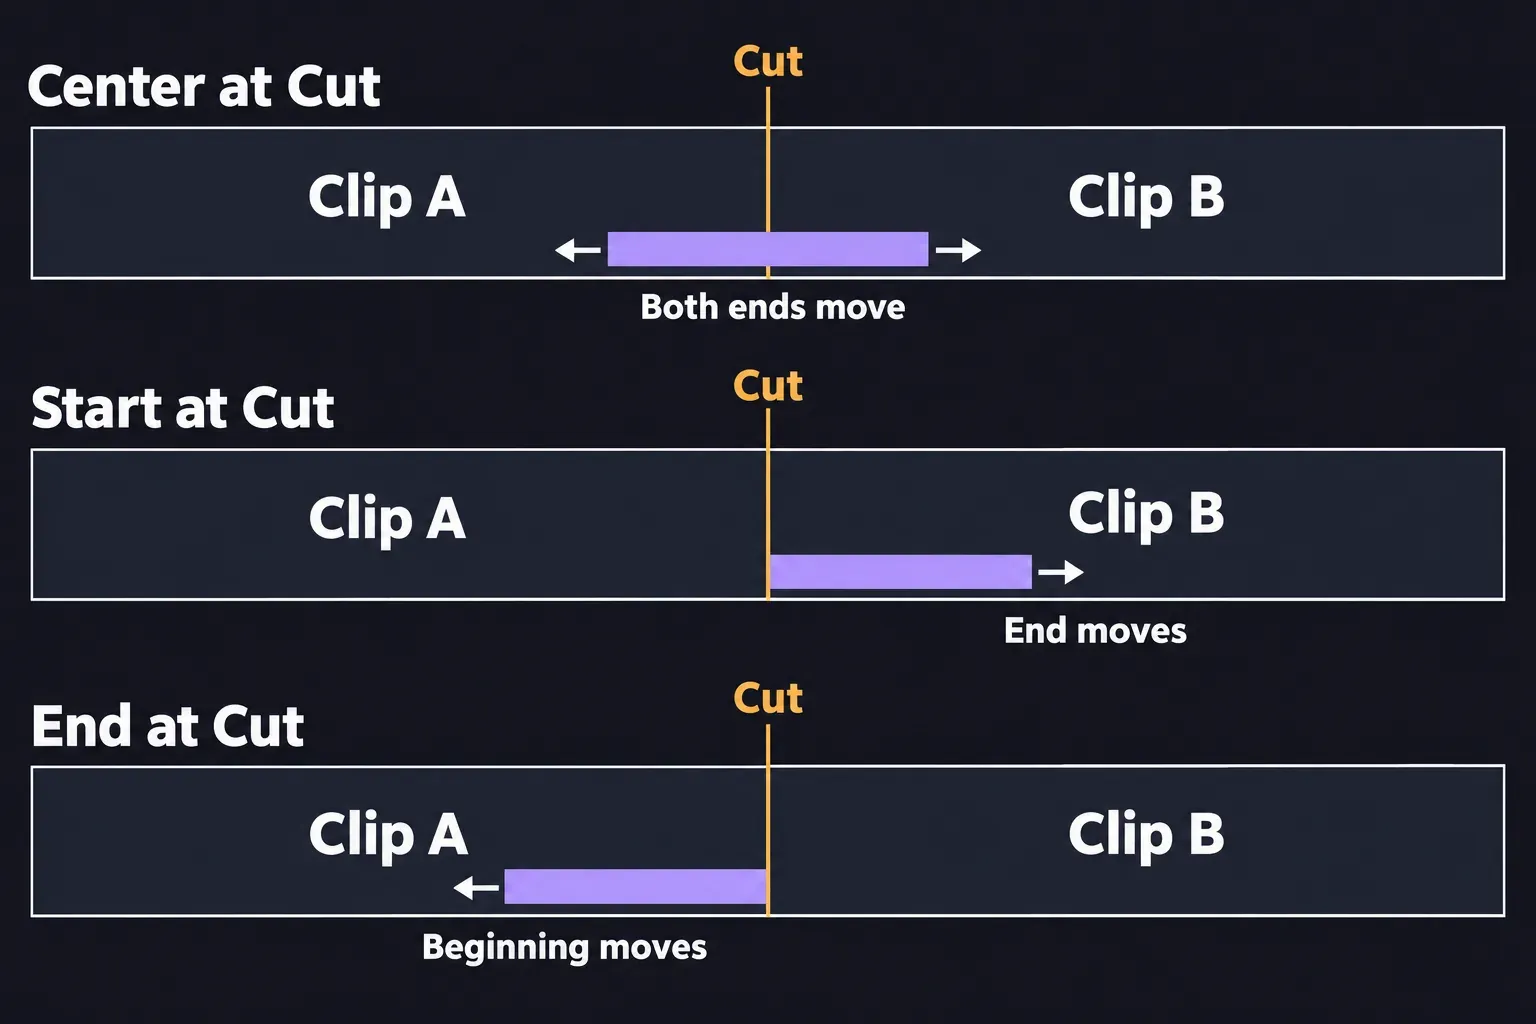
You can drag the transition along the cut for a different position. Custom Start appears after you move it to a custom position; its two ends then change equally when you adjust Duration. Play across the revised transition and check where the change begins relative to the action.
Fix frozen or repeated frames
Clip handles are the unused source frames before a clip's In point and after its Out point. A centered dissolve uses footage after clip A's visible end and before clip B's visible beginning. The clips keep their timeline length when you add the transition.
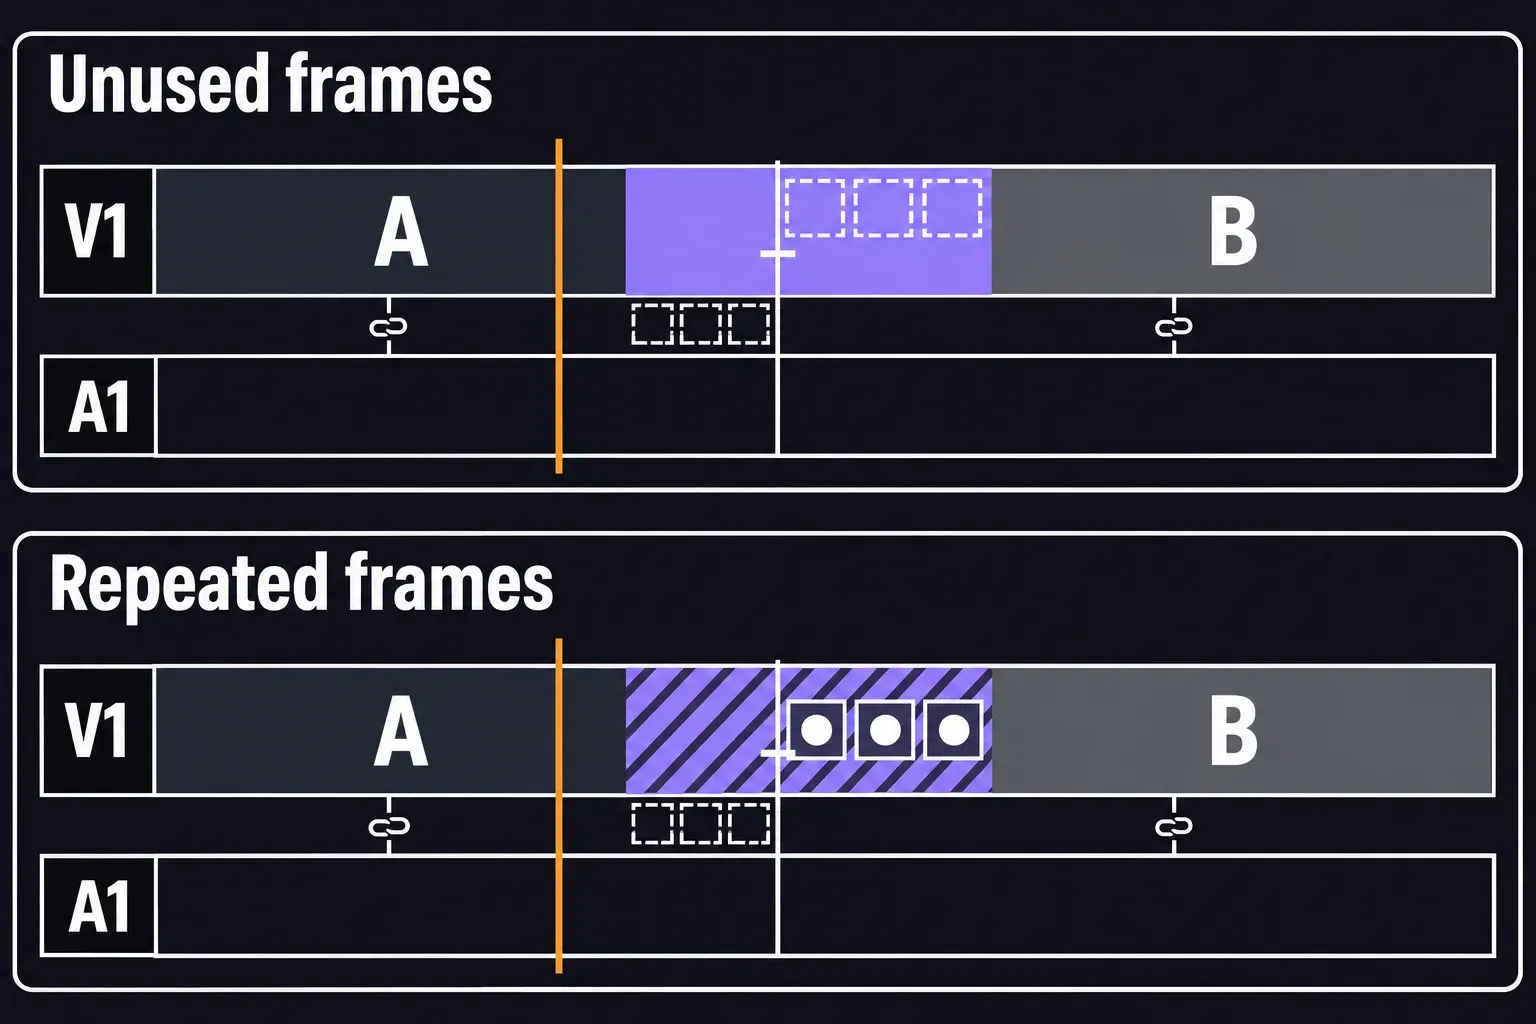
When there are too few frames, Premiere can warn that the transition will contain repeated frames, then use a held end frame for the missing stretch. Diagonal warning bars mark that condition. With no handles on either clip, Adobe describes an Insufficient content message or an X beside the Selection tool, and the transition cannot be added there.
Choose the repair by what must stay put:
- Keep the edit timing: shorten the transition first. If some unused frames exist, a shorter blend may fit without moving the cut.
- Keep a centered blend: retrim the clips to leave enough media beyond both sides of the edit point. A ripple trim changes timing farther along the sequence; check later titles and music after the change. Adobe also describes rolling the edit point to recover a short handle, which changes the shot boundary while preserving the two clips' combined duration.
- Use a transition on one clip: if A has no outgoing handle, Adobe's table suggests one that begins at the cut on B; if B has no incoming handle, it suggests one ending at the cut on A. This changes the treatment of the join, so replay it and judge the result.
To force a single-sided transition at an adjacent cut, hold Ctrl on Windows or Command on macOS as you drag it from Effects. Release over the Start at Cut or End at Cut icon. The single-sided transition affects that clip, giving you a deliberate opening or closing treatment.
After any repair, play from before the transition until both picture and sound have settled into the next shot. Check for a held face, a repeated movement and words lost when the cut moved. If the new timing harms the scene, keep the straight cut rather than forcing a dissolve.
Add the audio crossfade separately
For sound, expand Audio Transitions > Crossfade in Effects and drag Constant Power onto the A1 cut. Adobe lists three audio crossfade shapes: Constant Gain changes level at a constant rate and can dip at the midpoint; Constant Power uses a curved blend; Exponential Fade gives a more gradual fade.
Start with Constant Power for a sound change that needs blending, then listen at the join. Shorten the crossfade if it smears the start of a word, and check the sound on both sides rather than matching the video transition's length automatically. A picture dissolve alone does not tell you whether the dialogue edit sounds right.
Set a default and apply it to selected cuts
Cross Dissolve and Constant Power are Premiere's initial video and audio defaults. A blue outline marks the default transition in Effects. To choose another, right-click it in the panel and select Set Selected as Default Transition. This preference applies across projects, but changing it leaves transitions already on your sequences unchanged.
For several cuts, select the adjacent clips you want to connect, including the linked audio if both picture and sound should receive defaults. Choose Sequence > Apply Default Transitions to Selection, or Shift + D on Windows or macOS. It applies at the boundaries where two selected clips touch, not at the outside edge of the selection. The playhead position and targeted tracks do not decide that command's placement.
The separate commands are Apply Video Transition, Ctrl + D on Windows or Cmd + D on macOS, and Apply Audio Transition, Ctrl + Shift + D on Windows or Cmd + Shift + D on macOS. These are the default assignments in Adobe's shortcut table; customized sets can differ. Check the intended cut and the applied blocks before continuing.
Set the default length in Edit > Preferences > Timeline on Windows or Premiere > Settings > Timeline on macOS. Change Video Transition Default Duration or Audio Transition Default Duration and select OK. The new duration affects subsequent applications, leaving existing transitions at their current length.
To reuse an adjusted transition, select it, copy with Ctrl + C on Windows or Cmd + C on macOS, select the destination edit point and paste with Ctrl + V or Cmd + V. Copy video transitions to video tracks and audio transitions to audio tracks. To replace a transition, drag a new one onto its block: the duration and alignment remain, while the old transition's other settings are replaced.
When an older tutorial looks different
Premiere now also has video transition handles at clip edges. Dragging one applies the default video transition and adjusts its length visually. These are on-screen controls, separate from the unused footage also called clip handles. If they are hidden, check Timeline Display Settings: version 26.5 added show/hide options for audio and video transition handles.
Adobe's September 2025 update added more than 90 effects, transitions and animations, rather than 90 transitions alone. In version 26.0, the library was reorganized and Cross Dissolve gained a modern replacement. The older Cross Dissolve is labeled Legacy; existing projects retain their applied version, and a customized default is respected.
You can complete this workflow with the included transitions. Before adding a separate pack, check its supported Premiere version, operating system, license and installation instructions on the vendor's own site. A pack cannot supply the source frames missing at your edit point.
Finish with one pass across the cut at normal playback speed. Watch that both shots keep moving, listen for the first word in the incoming audio, and check that the transition ends before the next action needs your attention.