How to get Premiere Pro on a different drive
Set a new Creative Cloud install location, keep the system-drive components in mind, and move Media Cache or project media without confusing their paths.

To install Adobe Premiere (formerly Premiere Pro) on another drive, open Creative Cloud desktop and use Account > Preferences > Apps > Install location, then choose the destination and select Done. The change applies to future installations; an existing copy needs the uninstall-and-reinstall route below. If the immediate problem is a full system drive, I'd move media and Media Cache first: Adobe's storage guidance supports both on a fast second drive, and moving them doesn't mean reinstalling anything.
Choose between moving the app and moving working files
The application, Media Cache and source footage have separate locations. Changing one doesn't relocate the others. Adobe's storage recommendations put the OS and apps on a fast system SSD, allow fast external drives for media and cache, and let media and cache share the second drive in a two-drive setup.
| Your goal | Change this location | Keep in mind |
|---|---|---|
| Install the Premiere application elsewhere | Creative Cloud's Install location | Changes future app installations, not the project or media paths. |
| Stop cache accumulating on the system drive | Premiere's Media Cache preferences | Cache files and the cache database have separate location controls. |
| Edit footage stored on a second drive | The project and source-media folders | Moved source files may need Link Media; keep the original copy until verification. |
Leave space on the system drive even when the app goes elsewhere. Adobe lists 8 GB of installation space plus additional setup space and excludes removable flash storage. For the application itself, pick a local drive or partition. Adobe's note on networks and removable media treats local hard disks as the supported baseline, so a fast external media drive is a different job from an app install destination.
Set the destination for a new Premiere installation
Connect the destination drive and confirm that you can write to the intended folder. Then open the Creative Cloud desktop app from the Windows taskbar or macOS menu bar. Use the desktop app's preferences, rather than your account page in a browser.
- Select the Account icon at the upper right, then Preferences.
- Select Apps in the left panel. Under Installing, find Install location.
- Select the Default location control, shown with a pencil beside the location. Choose the folder on the other drive and select Done.
- Return to Apps > All apps, find Premiere and select Install. Follow the installer prompts.
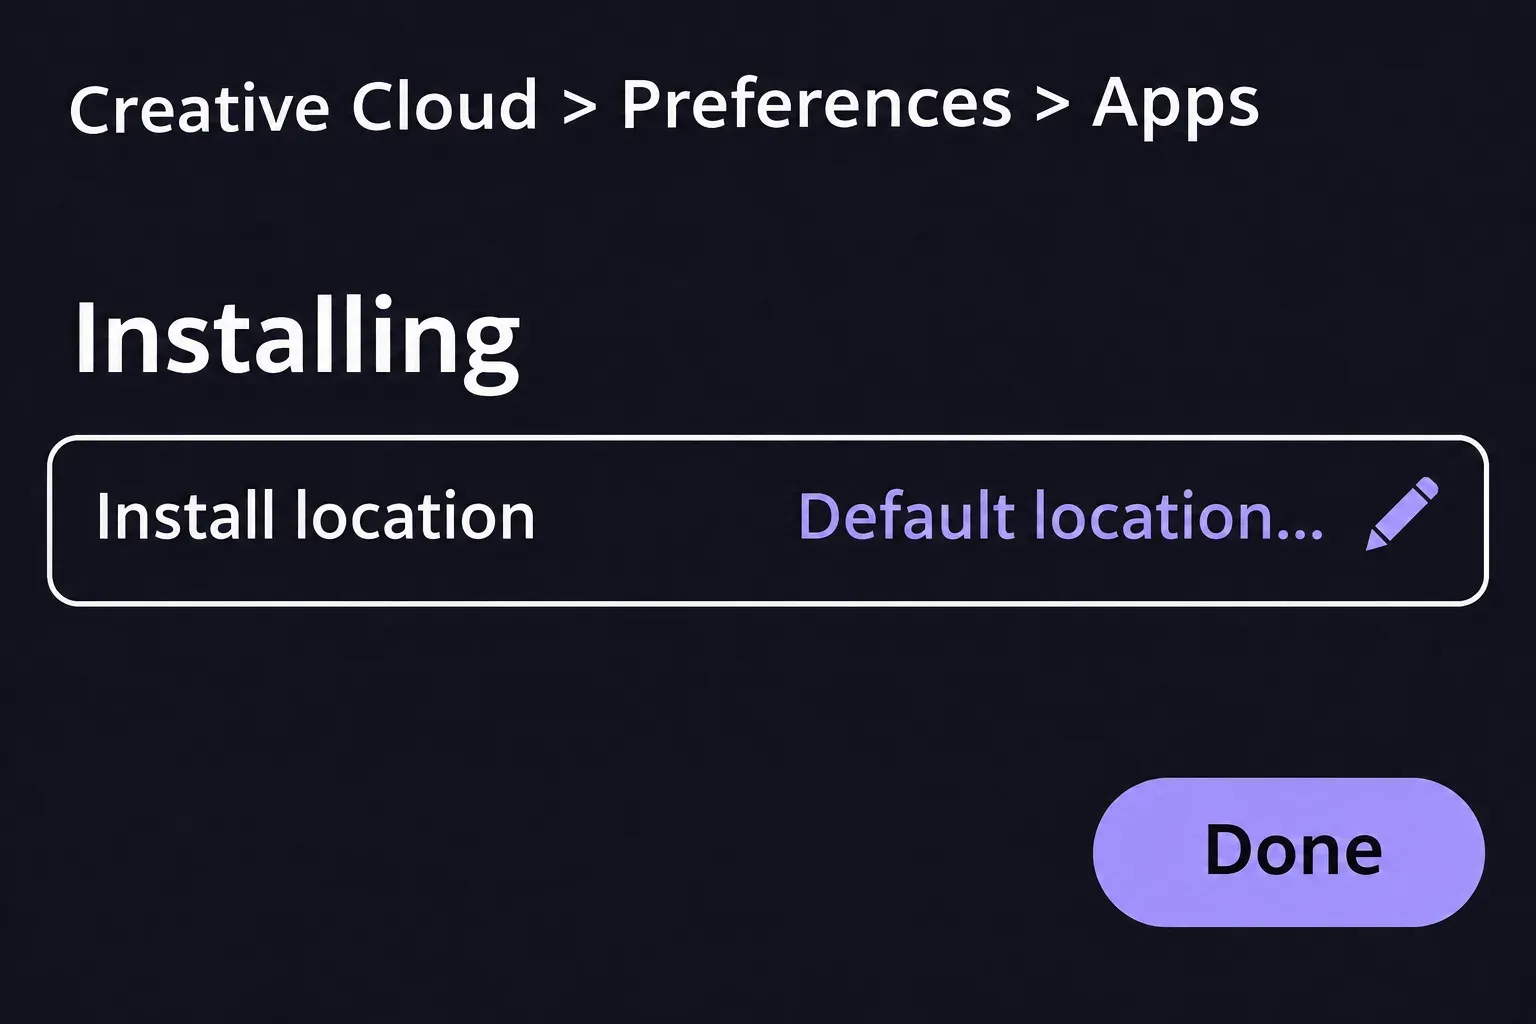
If the installer reports insufficient space, check free space on the selected destination before trying again; Adobe's install-location steps ask for enough free storage on the chosen drive before you switch. Freeing space and changing the location both affect the next installation only. Neither one moves a copy that's already installed.
Relocate an existing installation
Save a project copy and back up settings you need before uninstalling. Keep an inventory of third-party plugins so you can check them after the move. Don't drag the application folder to another volume. The accepted Adobe Community answer on installing Premiere to a D drive moves an existing copy by uninstalling, changing the destination and reinstalling.
- Save your work and close Premiere. In Creative Cloud desktop, open Apps > Your apps.
- Open Premiere's More actions menu and select Uninstall. Choose Keep: Adobe's uninstall options say it retains notifications, interface settings, plugins and other preferences, while Remove deletes them.
- Set the new Install location in Creative Cloud preferences, then use Apps > All apps > Install to reinstall Premiere. If a project has to stay on an earlier release, my guide to updating Premiere shows where Creative Cloud keeps Other versions.
- Open Premiere with the destination drive connected. Check the settings and plugins your project needs before removing any backup.
A second app destination doesn't empty the system volume. Adobe documents Install location as the place future apps go, not as a move for everything Creative Cloud keeps on the computer, so check free space on the OS drive again after the reinstall instead of assuming the whole footprint left.
Move Media Cache without losing track of the old folder
Media Cache holds files such as .pek peaks and .cfa conformed audio; its database records links to those files. The Media Cache controls let you choose their locations with Browse. I'd use a clearly named folder on a fast SSD, separate from the source footage, so later cleanup can't be confused with deleting camera files.
Record both current paths before changing them. Cache deletion costs rebuild time: Premiere recreates needed files when it reads the source media, and a large project can take time to settle. Save the project and close all projects before a complete cache clear.
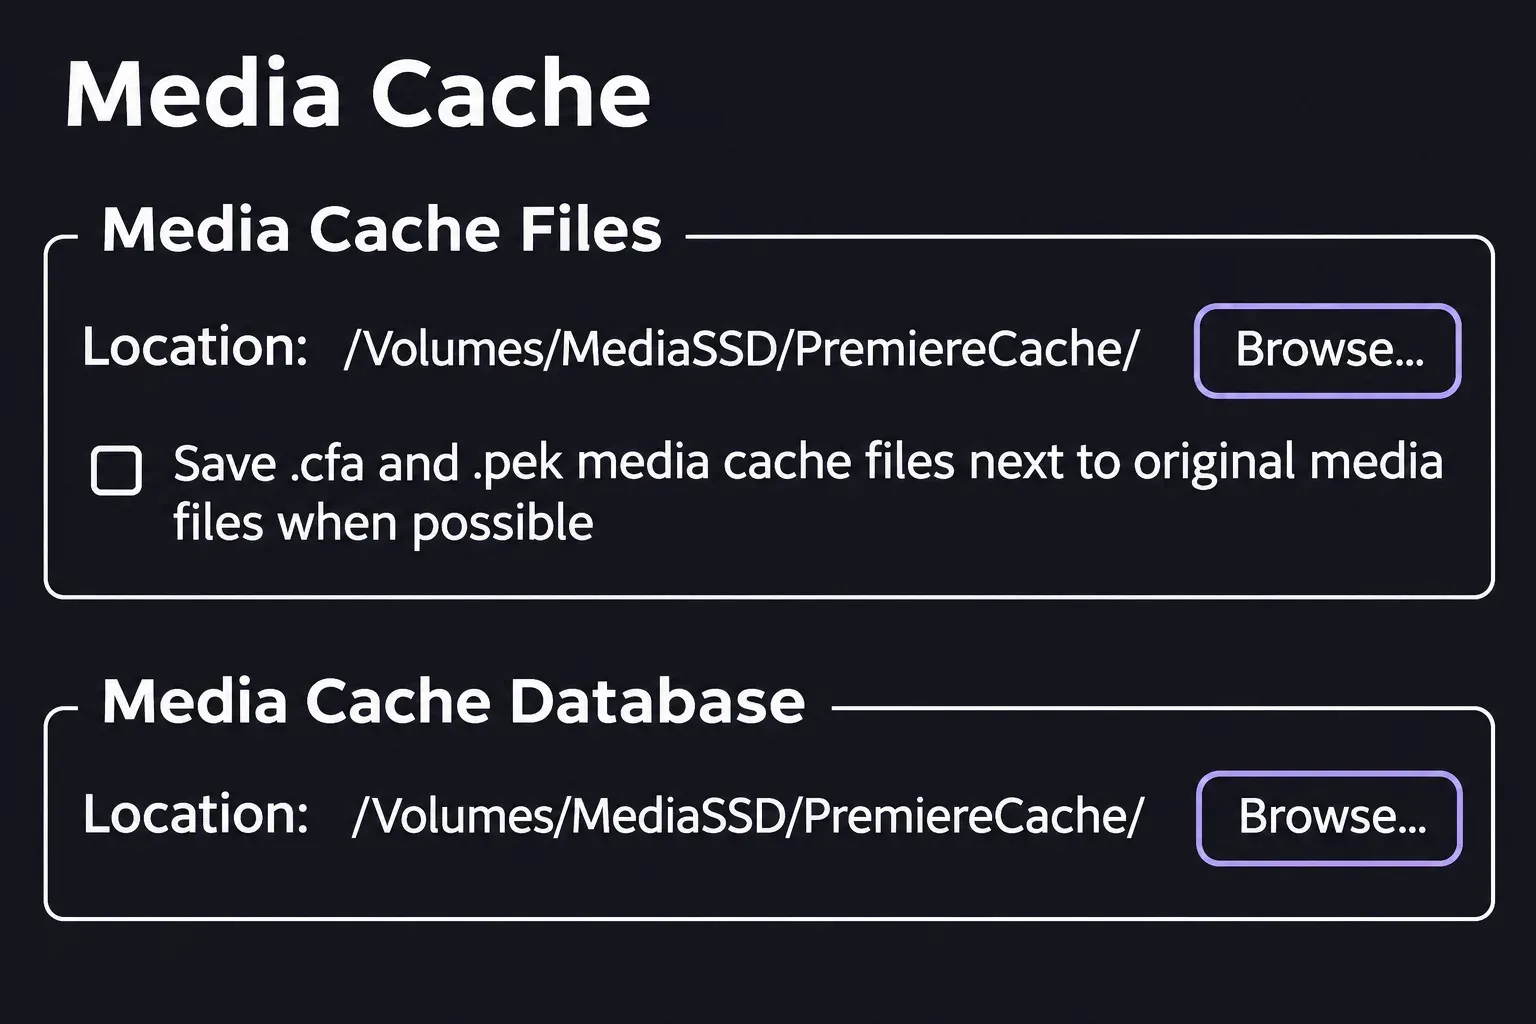
/Volumes/MediaSSD/PremiereCache/ is an example Mac folder. Open the full-size Media Cache controls.- Open Edit > Preferences > Media Cache on Windows, or Premiere > Settings > Media Cache on macOS.
- If you're reclaiming the old cache now, do it while that original location is still selected. Delete beside Remove Media Cache Files opens the clearing options. Delete unused media cache files removes cache whose source media can't be found. For a complete clear, restart Premiere and choose Delete all media cache files from the system before opening a project.
- Create a dedicated folder on the destination drive. Use Browse for Media Cache Files and Media Cache Database, selecting the intended folder for each. If you want cache centralized there, leave Save .cfa and .pek media cache files next to original media files when possible unchecked.
- Reopen Media Cache preferences to confirm both paths, then open the project and allow required cache files to rebuild.
Despite the broad wording of the full-clear button, Adobe says it deletes cache from the current location. After you've switched locations, that button doesn't clean the folder you previously used. If you kept the old cache during the move, quit Premiere before any manual cleanup and use the recorded old cache paths. Adobe's manual removal procedure starts with the app closed. Remove only the identified cache files; don't delete source footage or the entire parent Adobe/Common folder.
Copy the project and source media to the second drive
Changing Creative Cloud's install location leaves existing projects where they are. For a folder-based move, save a new project version and copy its media folders to the new drive. Preserve the folder structure. For camera-card media I'd copy each card as one whole folder rather than picking out the video files, so whatever the camera wrote beside them travels too.
For a project whose imported media is scattered across folders, use Project Manager's collection workflow:
- Open File > Project Manager and select the sequences to include.
- Select Collect Files and Copy to New Location. Check Exclude Unused Clips: leave it off if you also need unused imported media in this copy. The collection follows the selected project content; keep full camera-card backups separately.
- Use Browse under Destination Path. Select Calculate to update the disk-space estimate, review the chosen options, then select OK.
- Open the new project in the
Copied_[Project Name]folder. Keep the original project and media available until the copied version passes your checks.
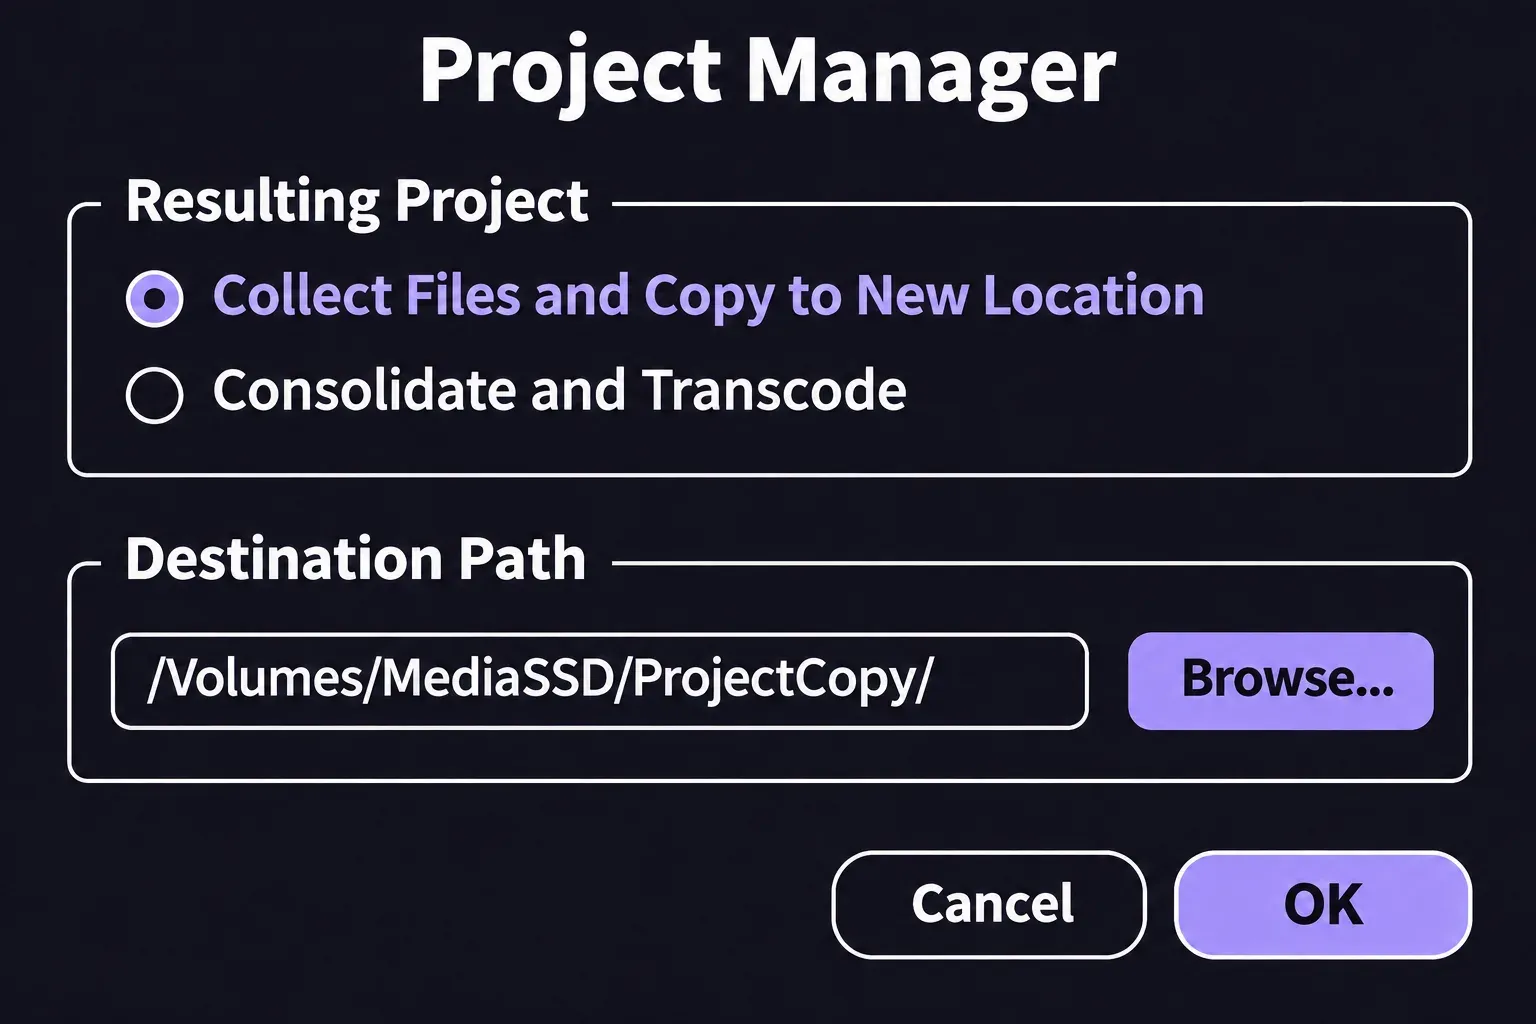
Consolidate and Transcode changes the media-preparation task to a codec-based archive. Keep it separate from a straightforward relocation. A collected media folder also doesn't replace your backup of settings or the installers for plugins needed to open the edit.
Reconnect media if the paths changed
Moved or renamed source files can appear as Media Offline. In the Project panel, select the affected clips, right-click and choose Link Media. Use Locate to select the correct source file, and check its old path and identity before accepting it. Adobe's relink instructions explain that Relink others automatically can reconnect further files matching the selected properties. Matching a filename alone isn't a reason to accept the wrong take.
Prepare an external media drive for the machines that will use it
Use a fast, stable connection for external media and cache, and keep another copy of irreplaceable footage. In a shared-storage setup, Adobe recommends keeping Media Cache local. Don't turn a network-media recommendation into permission to install the application on a network drive.
For a Mac-only SSD, I'd choose APFS because Apple optimizes it for flash and SSD storage. For media shared with Windows, Apple's Disk Utility format guide lists ExFAT as Windows-compatible. Before changing a drive's format, copy everything you need elsewhere: erasing a storage device deletes everything on it.
Verify the move at the playhead
Open the project from its new folder and confirm that the intended source files are online. If you relocated the app too, check that Premiere opens from the new installation with its destination connected. Recheck both Media Cache paths after opening the project.
Park the playhead a little before an edit and play across it. Watch for a missing or held frame, then listen for missing sound and lip sync. Keep the old media copy until the sequence checks out. If a clip is still offline, continue with the Media Offline troubleshooting guide.