How to separate audio from video in Premiere Pro
Unlink a timeline clip or select only its audio, cut the sound independently, restore sync before linking, and export a sequence mix or extract source audio.
To separate audio from video in Adobe Premiere (formerly Premiere Pro), select the linked clip in the Timeline and choose Clip > Unlink. Click an empty area of the Timeline to clear the selection, then select only the audio before moving or deleting it. For a single audio edit, you can keep the clips linked and hold Alt on Windows or Option on macOS while selecting the audio portion. Exporting an audio file is a separate step through File > Export > Media.
Choose the operation by the result you need:
| Needed result | Operation | What it acts on |
|---|---|---|
| Edit attached sound independently | Unlink | The selected linked clips in this sequence. |
| Deliver the edited dialogue or mix | Audio-only export | The selected sequence and its audible tracks. |
| Create an audio asset from source footage | Extract Audio | The source clip selected in the Project panel. |
Unlink the clip, then select its audio
Start with the sequence open and the clip already on its Timeline. If the Timeline is hidden, choose Window > Timelines and open the sequence you need. The picture and its sound occupy separate tracks, even while Premiere treats the linked pair as one selection.
- Choose the Selection Tool (V) from the Tools panel.
- Select the linked clip in the Timeline. Check that the intended video and audio portions are highlighted.
- Choose Clip > Unlink, the menu route in Adobe's instructions for linking and unlinking clips.
- Click an empty area of the Timeline to clear the selection, then select the audio clip. Check that the video is no longer highlighted before you act.
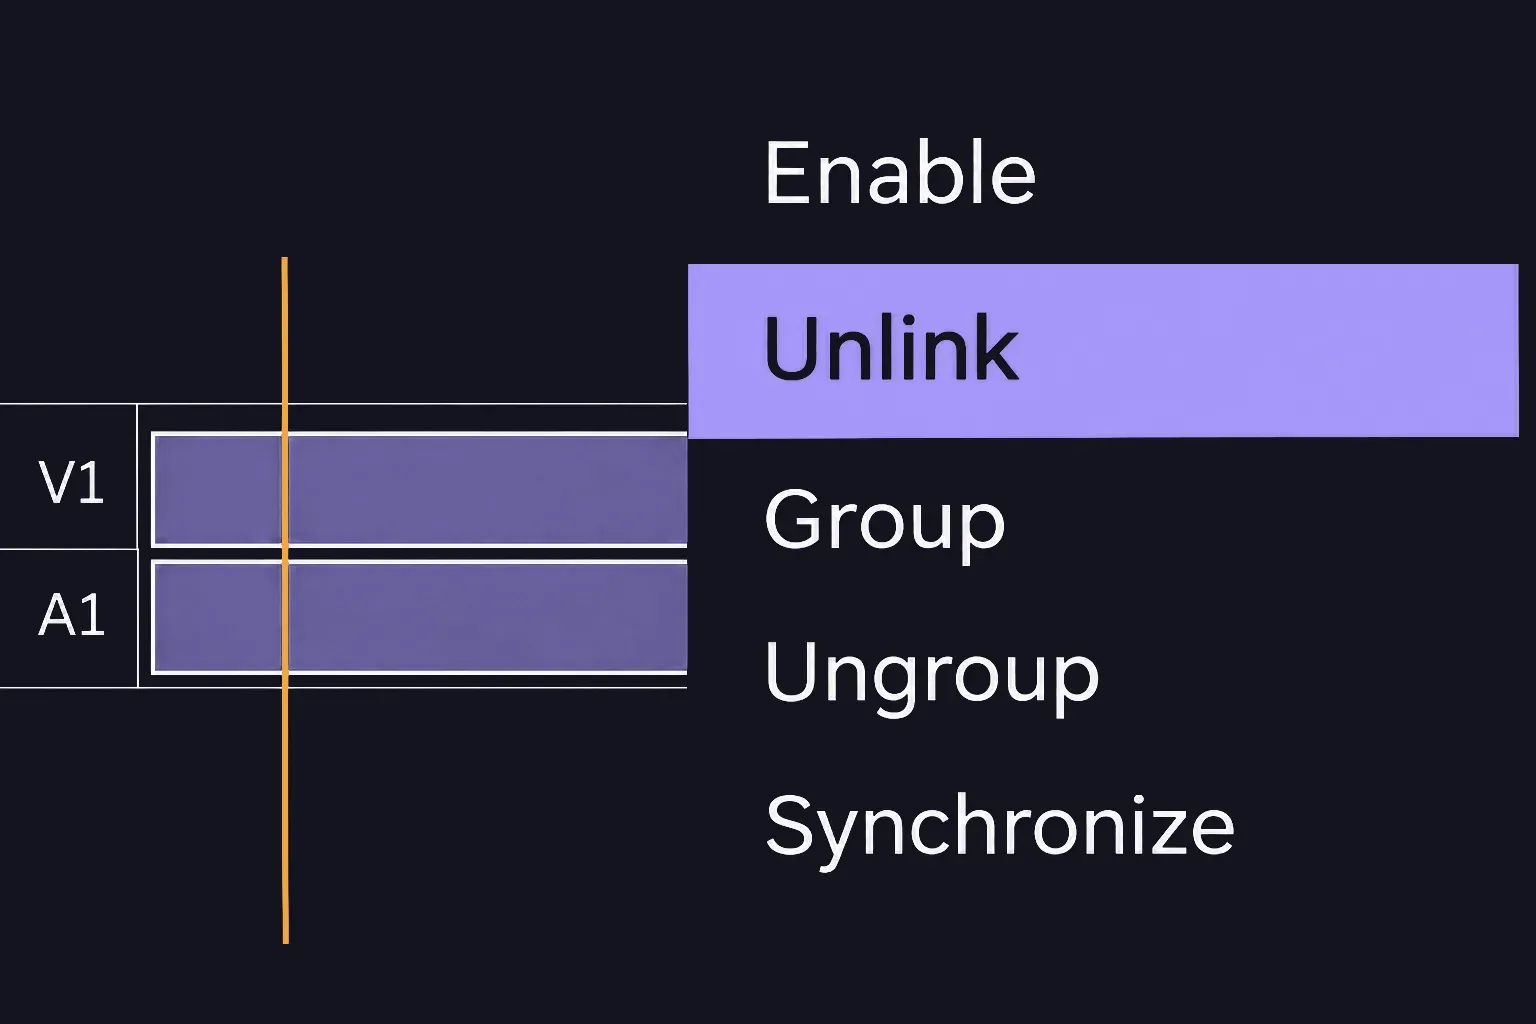
You can now move the sound independently or delete the selected audio while retaining the picture. Unlinking changes the relationship between the clips in this sequence. It doesn't create an audio file, and the original source clips in the Project panel remain available.
Before moving dialogue, decide whether its timing should change. If a speaker's lips remain visible, keep the voice aligned with them; a sound moved under a different shot may deliberately play earlier or later. Park the playhead before the changed section and play across it. Listen for an unintended gap and watch the speaker's lips if they remain on screen.
Select only audio without unlinking
I'd use modifier selection for a single audio edit because it keeps the link available for later moves of the pair. With the Selection Tool active, hold Alt on Windows or Option on macOS, then click the audio portion of the linked clip. Adobe documents both keys for selecting one component of a linked clip.
Look at the highlight before moving, deleting or applying an effect: only the intended audio should be selected. This gesture changes the selection for that action; it doesn't perform Clip > Unlink. With Linked Selection enabled, a later normal selection can select the linked pair again.
Keeping the link doesn't make an independent audio move safe for sync. If you shift the sound relative to the picture, play across the changed point and check the timing before continuing with the edit.
Cut audio while the picture stays intact
Unlink lets you select the sound independently. Cutting divides the clip into pieces at the chosen points in time. To cut just the sound of a linked clip, use the modifier with the Razor tool:
- Locate the intended edit point in the Timeline and identify the audio portion you want to split.
- Select the Razor tool from the Tools panel.
- Hold Alt on Windows or Option on macOS and click that point on the audio clip. Adobe specifies this gesture for splitting only audio or video in a linked clip.
- Return to the Selection Tool. Check that the audio has an edit at that point and the picture remains one continuous clip.
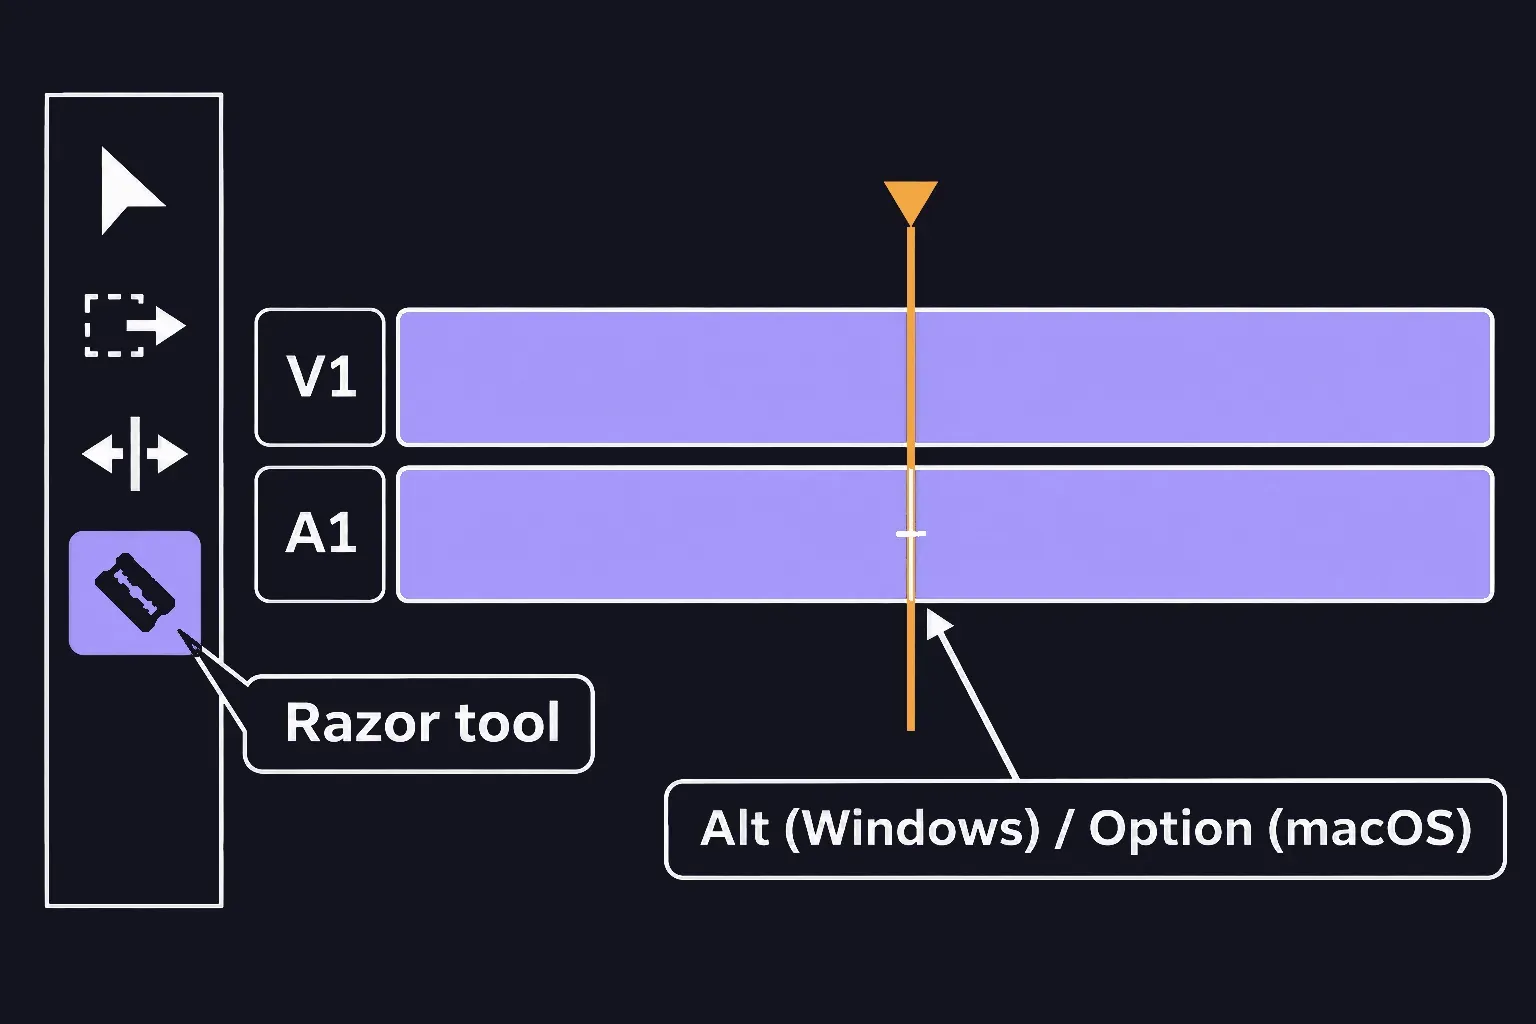
If the audio was already unlinked, use the Razor tool on the independent audio clip. After the cut, return to the Selection Tool and clear the selection. If the audio piece is still linked, hold Alt on Windows or Option on macOS while selecting it; select an unlinked piece directly. Check that only the intended audio piece is highlighted before moving or deleting it. Cutting alone doesn't remove a section; deleting or moving a piece is another edit.
Play from a little before the cut to a little after it. If you removed part of a sentence, listen to both sides of the new join. For an edit through the picture and sound together, follow the separate guide to split clips.
Restore sync before linking the pair again
Check alignment before choosing Link. Adobe describes Link as making the selected clips behave as a unit; it documents aligning clips in the Timeline as a separate operation. Don't rely on linking to repair an audio offset.
For a manual repair, drag the audio into alignment with a recognizable event in the picture, such as a visible clap and its sound. Play across that event, then check dialogue elsewhere in the affected section. If the two clips were trimmed to different moments, lining up their left edges alone doesn't establish sync.
You can also select the intended clips and choose Clip > Synchronize. In the Synchronize Clips dialog, choose a synchronization point that the clips share. Clip Start uses their In points, so use it only when those In points represent the same event. Timecode requires common timecode between the clips. Select OK, then play through the result.
Once the sound and picture agree, clear the selection. Shift-click the intended video and audio clips, then choose Clip > Link. With Linked Selection enabled, selecting one part should highlight the pair. Play the section again before making further timing changes.
If you link several audio clips to a video, Adobe requires the audio clips to use the same track format and channel type, with each on a separate track. Existing links must be removed before creating that multi-clip link. Select only the components you intend to keep together.
Export the audio as its own file
For an audio file of the edited sequence, prepare the sound you want to hear in that sequence first. Unlinking is useful for independent edits, but it isn't a prerequisite for exporting the finished sequence's audio.
For example, a simple track stack might be V1 interview picture, A1 dialogue and A2 music. For a dialogue-only file, leave A1 audible and mute A2 before export. For the full mix, keep both intended audio tracks audible. Treat this as an example, not a required track layout.
- Select the sequence you want to export, then choose File > Export > Media to open the export settings.
- Choose an audio format, such as WAV, MP3 or AAC. Choose the file type required by the person or application receiving it.
- Check the range in the Preview panel before you export. It can be set to a custom duration, so confirm the output covers what the delivery needs: the whole sequence, or only the section between your In and Out points.
- Check the output location and the audio settings, including channel layout and sample rate, against the delivery requirement. Select Export.
Adobe's audio extraction and export guide lists those audio formats and reminds you to leave the wanted tracks unmuted. Check the range before export so a short marked section doesn't become the entire delivery.
Open the exported file in its destination player or application. Listen at the beginning and end, then across the edited section. Confirm that the file contains the intended dialogue or mix and ends at the expected point.
Extract audio from a source clip
If you need the sound from a source video rather than the edited sequence mix, select that source clip in the Project panel and choose Clip > Audio Options > Extract Audio. The Extract Audio command creates new audio files and adds “Extracted” to the end of their filenames. The original source clips stay as they were.
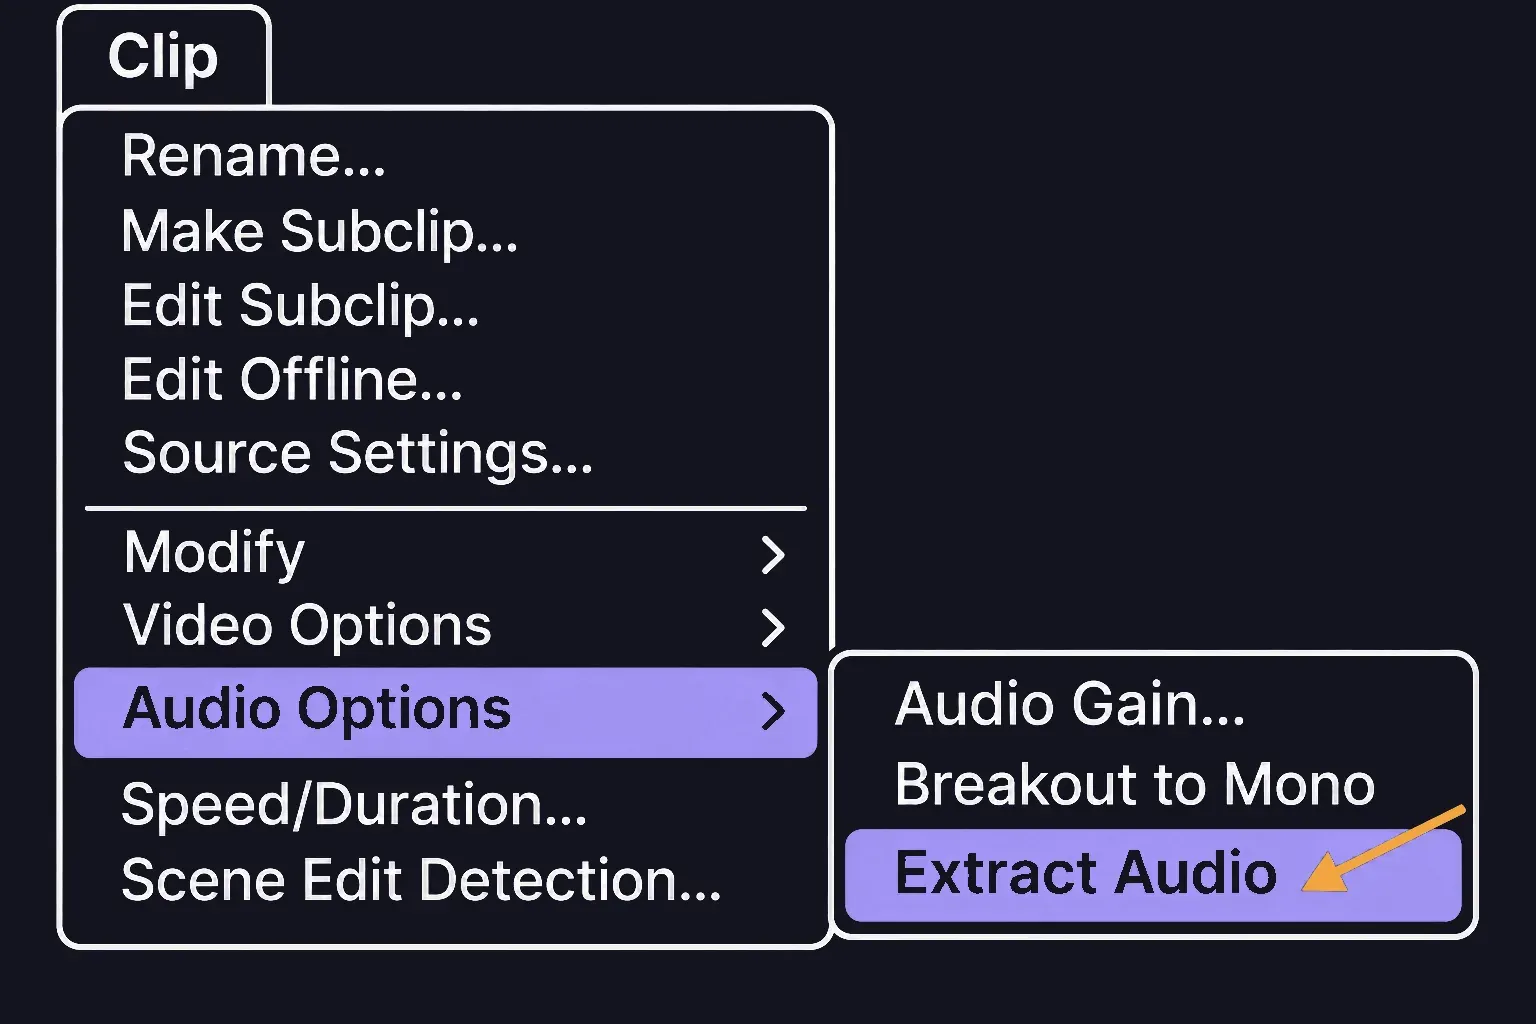
Premiere applies source adjustments, including channel mapping and gain, to the extracted audio. Use sequence export when you need the sound of the assembled edit, with its other audio tracks.
Back in the sequence, play once across every changed audio edit and check any visible speaker against the voice. For replacement sound, record a voiceover, then add music once the timing is settled. The site's audio guides cover the next adjustments.